Patterns

Patterns

Pages

Saturday, June 17, 2017

Wedding Dress Part 4--Construction of the Strapless Bodice

        Making the strapless underlay of my dress was a learning experience for me, having never made a strapless garment before. I used spiral steel boning to support the foundation in my dress, which was cut by my fiancĂ©, Matt. J After playing around with the fit, I started my dress by cutting out the bodice pieces. I followed Pattern Hack Fairy’s strapless dress tutorial pretty closely 
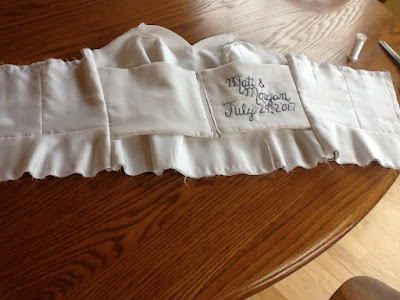
and started with the back waist closure, which was created from my back and side back pattern pieces. I stitched the boning to muslin fabric, which was basted to my satin wedding dress fabric. I used my lining fabric and silk organza to line the closure. Before stitching the front to the back, I embroidered our names and our wedding date to one of the panels for a fun "something blue" touch.


     Inside the bodice, I used cotton twill to support my fashion fabric. The boning was sewn into the cotton twill, which I sewed to the china silk lining of the bodice. 
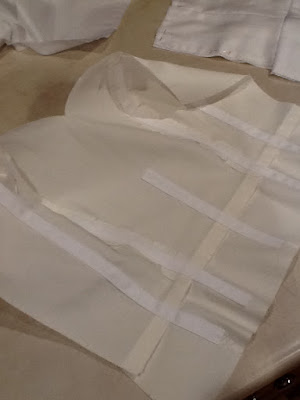


I also used cotton batting in the bodice, which helped support and shape the bust. I used Sewaholic’s tutorial to help create padded bra cups using the batting. Tasia’s tutorial features pieces of batting which are layered on top of each other and stitched together to provide more shape in that area.


            One of the trickiest parts of this project was connecting all of the layers together at the sweetheart part of the neckline. It was very thick and had lots of layers. If you look closely, it’s a little wobbly here and there, but I did my best to take it slow and stitch a consistent line.  Coming up next, I plan to write about the lace overlay on the bodice!

Wedding Dress Part 3--The Fabric

     This post is dedicated to the fabric that I selected for my Wedding Dress! I knew that I wanted nicer fabric than what is available at my local fabric stores, so I had to search online for my fabric. It was a little bit nerve wracking ordering so much fabric without seeing it or touching it, but I am really happy with what I ended up with!

All of the fabric when it came in!

      Let's begin with the fabric that helped create the shape and structure of the dress. As I will mention in another post, I used cotton batting and cotton twill to help give the strapless bodice structure. Both of these were purchased at my local Jo-Ann's. I used quite a bit of silk organza to give support as I made my dress as well. I have never used silk organza and it is very nice! I used it on pieces that I thought needed a little extra strength, like in the strapless bodice, and to underline my lace overlay. I purchased my silk organza from the Susan Kahlje store.

Silk Organza underlining

          I underlined my fabric, and used both cotton batiste and cotton voile. I used the voile, which is the more lightweight of the two, to underline the skirt, and the batiste to underline the strapless bodice. For the lining, I used a china silk lining fabric. It is very glossy and has lots of drape! All of these were bought from fabric.com
         For the underlay part of my dress, I knew I wanted a white satin fabric. I found this cotton/silk blend, which ended up working really well. The silk gives the fabric a beautiful sheen and texture, while the cotton makes working with it very manageable. I would definitely recommend this fabric and would enjoy using it again in other colors. 

Cotton/Silk Satin bodice
    Lastly, I purchased this lace for the overlay, also from fabric.com. I looked around quite a bit for the right lace, and am really happy with the one I selected. It is a nylon/cotton blend and has a really lovely pattern and a nice scalloped edge. 
Lace Scallops

Lace overlay
Unfortunately, my cat Peggy loves the fabric as much as I do. After I a few holes were found in my fabric, she was banned from my sewing area until the dress is complete. :)


Next, I will finally begin addressing the construction of the dress!